Water effects still pose a challenge for me. It’s not easy to get the height right for the table, and setting the barrier up to keep things from leaking during the pour seems impossible. These ponds will use some tips from various you-toobers and books to hopefully solve some of my problems with water effects.
All about that base
My experiment with MDF with the forest showed me that the top of the base should be the smooth side, and that cutting it on the laser is a good idea. Also, my workshop doesn’t have a band saw or jig saw for some reason… but I own a laser. I used the same shapes as I did on the forest terrain, but made them a bit larger and a little squat to fit three of them on the scrap MDF I had leftover from making some rings.
I’m using hardware store MDF, rather than the Glowforge premium hardboard, so I have to make a couple additional passes. That being said, I do actually like the Glowforge premium products. Their hardboard is very good quality, but wasn’t available when I wanted to order some a few weeks back.

Glowforge software 
Cutting 
Bases ready
Pool’s Edge
After sanding the edges with an orbital sander to create a sloped edge, I set down a bead of hot glue for the edge of the pool. Some places weren’t as high as they needed to be. That might come up later. Spackling created the slope up to the bead of glue. Flocking consisting mostly of sawdust added texture. Spraying black primer and brown added a touch of base colors to the bases.


In the second, third, and last pictures, you can see that I had a line of glue that extended too far inward from the edge of the base. I maybe should have drawn a line with a pencil before laying the hot glue down. Next time, I will score the glue line with the laser as an inset curve. Fusion 360 is perfectly capable of creating the inset I desire.
Also, note the sticks. They’re from desert broom, basically an invasive bush that grows here in Arizona. It was called a weed by my HOA, so I took it out last year. Cut in just the right way, the sticks will represent fallen logs or trees.
A little color
Coloring in ponds varies. I’ve seen bright green (algae blooms) in Louisiana, clear ponds, muddy ponds, weird blue ponds, and mixes of them all. Using what I have on hand, I threw some shades of blue and brown onto a sheet of parchment paper, and made a mess. I think my coloring looks okay, but I wish I had seen this video by Don Suratos before I started my water. I think the edging is blended so much better.

What is on hand. Bought 2 years ago. 
The mess. 
Not bad. Pretty blue. 
Touch of green. 
Some good color. 
Happy accidents.

The Pour
I’m using Woodland Scenics water, and it pours cloudy. No worries.


No worries until it started leaking. I had started pouring over my table, but quickly moved the pieces to some parchment paper (baking paper?) and wiped up my mess. The water oozed out in some places, where it looked as though the border was actually soaking up the stuff and spreading it around. It looked like a badly constructed earthen dam in some spots.
What went wrong here?
I could smack myself. I had just read the Terrainiac’s book on basic terrain making, and wouldn’t you know? I skipped a step. I must have been up late, or distracted by family life, because I totally didn’t seal the thing before my pour. It makes perfect sense that the plaster and wood soaked up the water effect as it sat overnight. Additionally, some spots were low, and some of the water effect was able to jump the lip. Between the lack of sealant and the odd dip, my water effect was doomed to jump the banks.
Pressing on
Correcting the error meant trimming the excess water effect from the edge and from the underside of the base.


Finishing touches
They look okay as they are, but the ponds need some character. The problem with adding character is that they make this terrain difficult to play on, in the eyes of most Warmachine players. Grass, flowers, frogs; they’re all things that destabilize models when placed on the terrain. And what about those logs?? How does a model go where the log is?


Tying down the rope 
Tire swing made from War Wagon wheel 
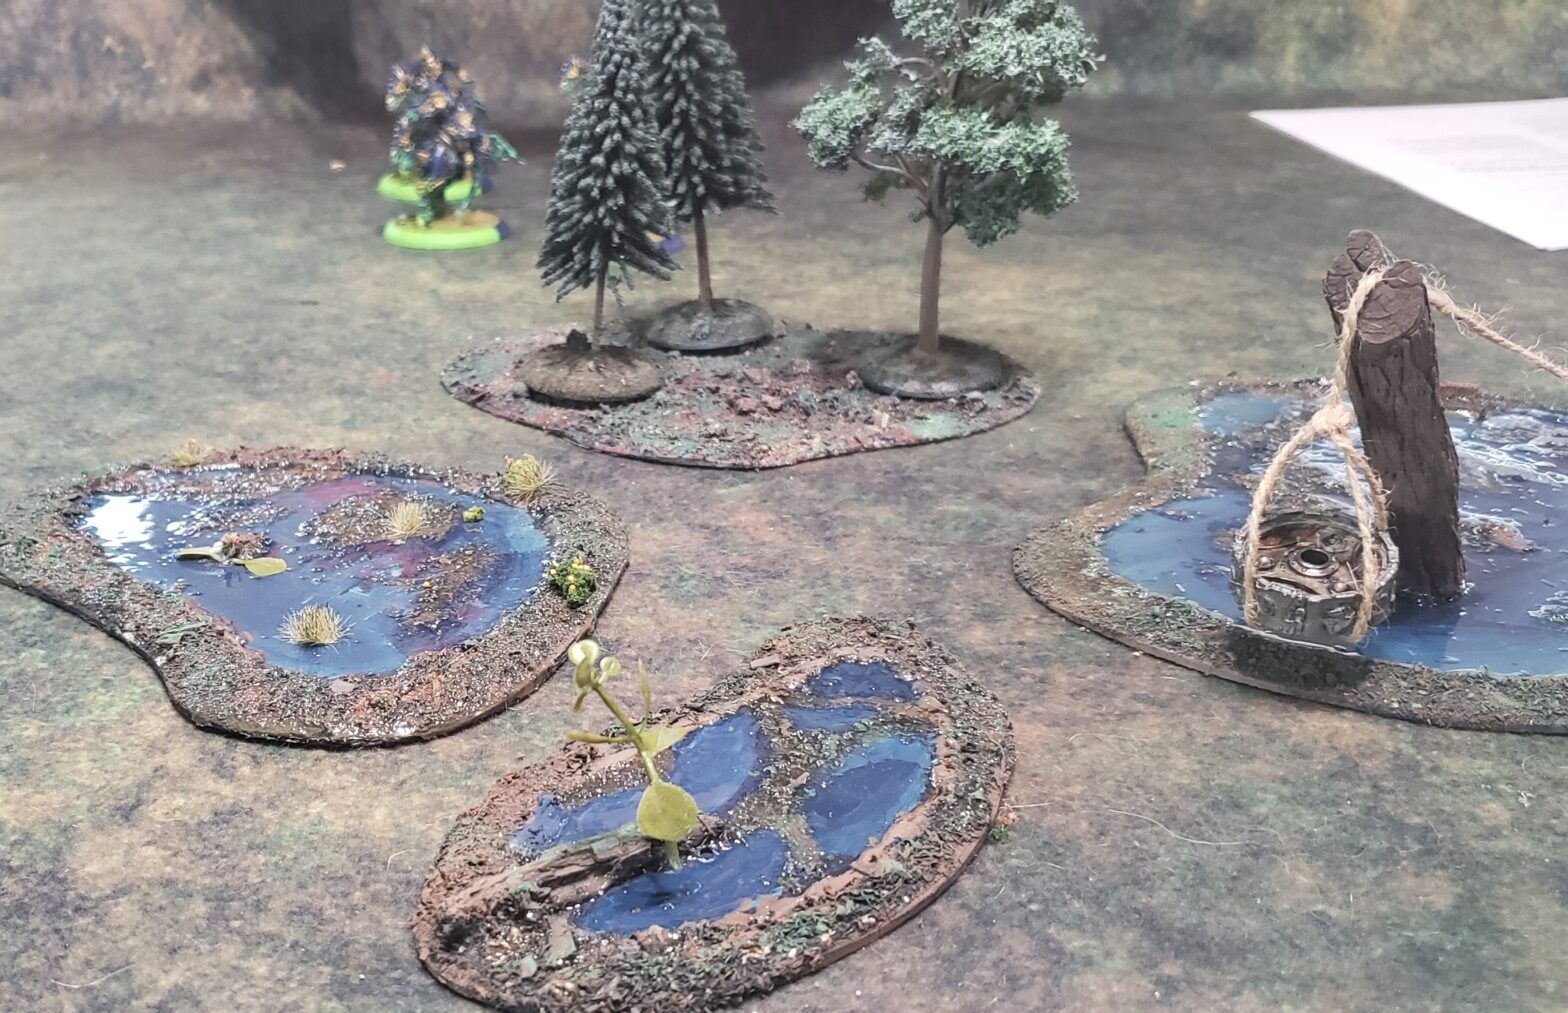
Ponds with forest in background


Personally, I just play around the terrain, and if my models don’t fit, they don’t get placed there.
The big pond got a war wagon’s wheel tied to the tree to serve as a tire swing of sorts. A spear handle from a Centurion secures the rope holding the wagon wheel.
Self-Critique
Overall, not bad. The ponds blend well with my existing terrain, but there could be more work done on the large pond with the wagon wheel. Maybe it needs a troll whelp playing on it.
Things I would change: I already discussed scribing the path for the glue, and sealing the model before pouring. I also want to try some of the painting methods from that video I linked earlier.
Future Plans
I plan on making some acid pools, contained by some sort of wall. Also, my wife has her Bane Riders finally painted, so she wants to play a few Brawlmachine games. More on all that, hopefully soon.