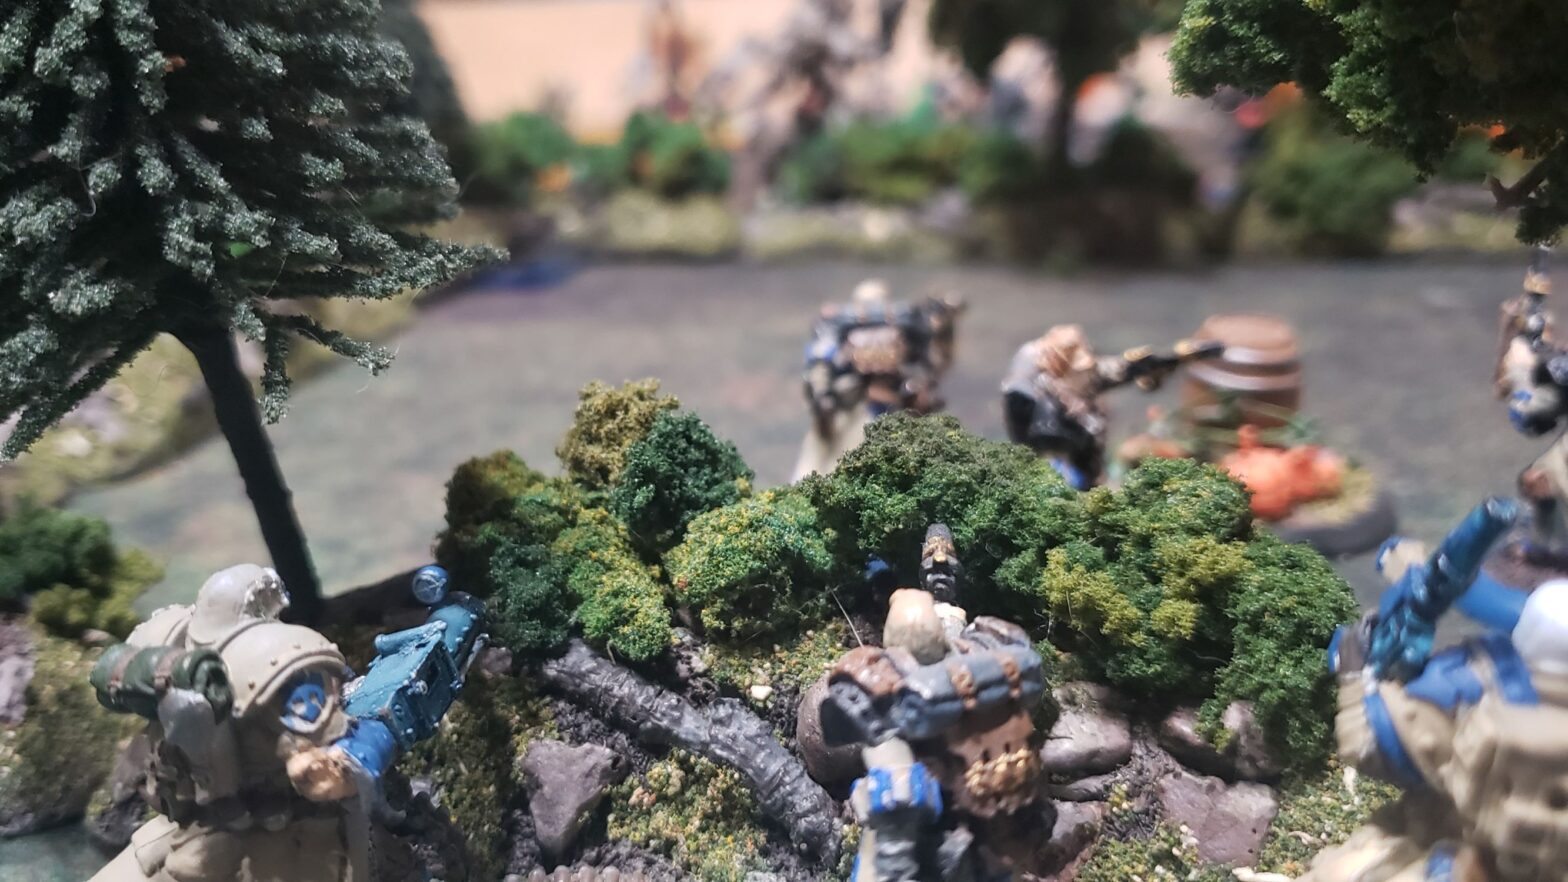
To make things interesting, my wife and I decided to play with some new terrain. A few years ago, I picked up some hedge rows, also called a Bocage, from a company specializing in Bolt Action terrain. Frontline Games Bocage System can be found on their site. They had a wonderful table set up at Texicon, and some of their pieces were in use at the Bolt Action game tables. Until a few weeks ago, my Bocage hedgerows sat naked of any foliage, save the occasional removable hole. I treated them like walls, but wanted more. Before playing this game, I read up on how other game systems handled the terrain. Most systems using these Bocages attempt to simulate combat in the second world war.
Bocages are areas of farmland or pasture bordered by walls made of pushed up earth, rubble, and vegetation. It’s as though someone made a series of dykes and let a small forest grow on top of them. Bocage hedgerows posed a difficult problem for ground troops fighting in Europe during the second world war. The thick vegetation and sometimes 5 foot tall earthen berms made penetrating them with vehicles or on foot challenging.
Games tend to treat the Bocage hedgerows as line of sight blocking with special rules for shooting through the hedges and crossing through. Why not adapt those rules to my Warmachine games for an extra challenge, and some variety in table setups?
New Terrain Rules
Bocage Hedge Rows
Bocage Hedgerows, or Bocages for short, are obstacles that block line of sight. If a model is in base contact with a Bocage, it may ignore the Bocage when drawing line of sight, and models may ignore the Bocage when drawing line of sight to the model in base contact. Models with Treewalker ignore the bocage when drawing line of sight. The Bocage never blocks line of sight to a huge based model. The Bocage is considered rough terrain.
Bocages are approximately 1” wide by 5” long by 4.5” tall.
Strategy implications:
Models can walk to be into base contact with the Bocage, shoot their guns, then reposition backward so they can’t be seen. Models with pathfinder, flying, ghostly, can pass through the Bocage with no penalty.
Lists:
Dessa recently painted some Cryx models for the Point-a-Day challenge on Facebook. She started reading about the models and was curious if we had enough models for a Satyxis army. Although we don’t have a ton of Satyxis, we have enough warjacks and Mercenary models to flesh out the army.
Her List
Scourge of the Broken Coast
- Warwitch Deneghra
- Deathripper
- Deathripper
- Defiler
- Defiler
- Reaper
- Satyxis Raider Captain
- Aiakos, Scourge of the Meredius
- Kharybdis
- Black Bella, Duchess of Dread
- Satyxis Raiders
- Satyxis Raider Sea Witch
- Croe’s Cutthroats
- The Devil’s Shadow Mutineers
The Satyxis were recently painted, as were the Mutineers (save a few missing arms). The rest of the army just fills in points. Deneghra works well with anyone. Her spells negatively affect enemy models, which means all models in her list benefit. Kharybdis is neat, a jack with lots of rules, Black Bella did good work in some Riot Quest games, and also sports a fresh coat of paint. Deneghra’s battlegroup gives her plenty of arc nodes.
My List
- Captain Victoria Haley
- Thorn
- Defender
- Captain Maxwell Finn
- Trench Buster
- Trench Warcaster Lieutenant
- Grenadier
- Commander Anson Hitch
- Grenadier
- Rangers
- Trencher Long Gunners
- Trencher Long Gunner Officer
- Trencher Commandos (min)
- Trencher Commando Officer
- Trencher Commando Scattergunner
- Trencher Express Team
I picked Captain Haley because it felt right to have the twins fighting each other on the same level. The Defender is a reliable jack, capable of dealing a single big gun shot every turn until things get close, and then it’s hammer time. Finn is great at slicing through units, so I hoped to throw him into the Satyxis or Cutthroats. The Long Gunners were freshly painted too (my points), and the Commandos are some models I’ve had forever and love fielding. Rangers are here because defense is high with Deneghra’s Satyxis.
The Game

Deployment:
We both picked the objective that gives Pathfinder. Cryx set up first, spreading out so the Cutthroats were on her right, and Satyxis on the left. The Cutthroats would do well holding their flag. Staying just far enough out of range that Stealth helped protect them, yet threatening to shoot anyone foolish enough to stand on the flag. My plan was to control the middle of the board with the Long Gunners, my left flag with the Buster, Lieutenant and Express Team and Right flag with Commandos and Finn.
Turn 1:
Deneghra pulls into the zone, standing just behind her objective, and Kharybdis waltzes up to the Bocage, flanked by Satyxis.

I start to run the rangers to the opposite side of the board, to take Prey off the table. Long gunners try to take advantage of Tactician from Hitch. Commandos bravely invade the zone on my right.

I don’t think these guys are going to survive long.


Turn 2:
There is a standoff on the cutthroat side of the board. Satyxis advance into their Bocage box, slaying commandos and paving a path for their Captain to sit on the flag. They know they won’t be able to claim it this turn, but it should be theirs by turn three. A Defiler sprays some Long Gunners.

Finn takes care of some of the Satyxis on his own but runs out of steam. The other commandos try to infiltrate the zone but are stymied by the high defense on the Satyxis. Their officer should have declared an objective for them, or maybe Haley could have moved over to support with some Temporal Barrier. Defender puts some damage on the Cryx objective.

Cryx 1, Cygnar 1
Turn 3
The Satyxis pushed in completely. They own that box, and with it, the flag. Cutthroats and Mutineers refuse to commit. Deneghra camps a ton and sits behind her objective with the Reaper blocking ranged attacks. Defilers are causing trouble for Cygnar, blasting two or three Long Gunners each time they unleash their sprays. She doesn’t fully commit the arc nodes either, saving them for spell casting.
Cryx 3, Cygnar 2.

This game is going to get out of hand really quickly. If I can’t take out the Satyxis, they’ll score again on my turn, and possibly their next. And the Reaper is about where he needs to be in order to start in on my objective. She has the potential to run the table.
My out is to turn on Haley and try for an assassination. Haley moves up, Temporal Distortion, and Feats. She takes two shots with her hand cannon, doing practically nothing. I intended to have Thorn slam the reaper into Deneghra, but I forgot after taking out he objective with a good shot from the Defender. The second shot goes into Deneghra. The long gunners advance and take a couple CRA shots. The Grenadier walks up and fires two shots into Deneghra. All that would have been easier, but I forgot the slam. I scored some really lucky attack rolls. Deneghra died.

Analysis:
Cryx warjacks gaining Gang Fighter in Scourge of the Broken Coast really makes them deadly. The ability brings Kharybdis to a natural MAT 9 POW 18 with his range 4 tendrils. With Deneghra throwing around debuffs, this jack simply kills things with little effort. Aiakos solves the Tough and healing problem, giving Kharybdis grievous wounds. The package is a little expensive, at 21 points for just Aiakos and Kharybdis, but throw in some warrior models and enjoy the carnage.
Dessa’s only real mistake was not applying her feat to keep my forces off Deneghra. If I hadn’t been able to assassinate her Warcaster, I don’t know how I would have turned the tide.
I really underestimated Croe’s Cutthroats at the beginning of the game. Dessa measured out her distances and made sure to keep the cutthroats spaced out to avoid my 3” AOEs. All good tactics. She made sure I wouldn’t be able to take that flag.
I’m not really utilizing Haley’s Temporal Barrier. She needs to be more involved, and not just sitting in the middle of the board. She needs to pick a side and push on it aggressively. Next time, I’ll let the junior hold an area while Haley pushes in with the trencher commandos.
The Rangers could have helped, but I deployed them on the wrong side of the table. Having stealth on the cutthroats meant the rangers wouldn’t really be able to crank up the attacks, especially since getting within 5 inches meant walking into a kill zone while the cutthroats could hide behind the bocage. Prey meant the rangers were doomed. Maybe it was good for them to take the prey and run. But they did little else.
Next time, I plan to set the Bocages up at an angle, so that in this scenario there is some unevenness to the terrain in relation to the flags. I really liked the terrain puzzle, and Dessa agreed that the game was really fun.